

By Arvind Kumar
This Article explains step by step instructions to boot Windows 10 OS on old desktop computers which don’t have ‘Boot from NVMe SSDs’ in their Bios / UEFI settings. This is a workaround method using Clover project.
Do you know that your old desktop can run at pretty amazing speed and you can still make the best use of your old Desktops & laptops. Do you know that most often the main culprit behind a very slow laptop or laptop is your hard disk drive(HDD). You can simply give a boost to your old computer / laptop by only one simple upgrade.
Swap you old and painfully slow Hard disk drive with SSDs!
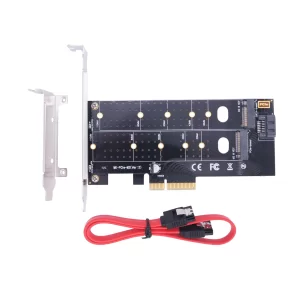
You have decided to give a new life to your old desktop PC and now you want to install a brand new and fast SSD. You went online and did a bit of research on SSDs and came to know that NVMe interfaced M.2 SSDs are the fastest and can be easily installed to your old / unsupported motherboard which usually didn’t had M.2 slot back then with the help of a PCIE M.2 NVMe SSD adapter card.

You can buy such PCI express adapter by clicking here.
Project Requirements:-
- Working Desktop Computer with PCI Express slot( gen 2 or 3)
- NVMe M.2 SSD Adapter
- NVMe M.2 SSD at least 256 GB( recommended size is 512 GB) for Windows 10.
- Basic Computer hardware Troubleshooting and OS installation Knowledge.
You have carefully mounted your NVMe SSD on the adapter card and cautiously inserted it in the PCIE slot of your motherboard.
Now you are ready with a bootable media of your favorite OS and you press your PCs power button. With a little bit of effort you selected your bootable drive from BIOS or Boot menu.
To your good luck you are able to detect your M.2 NVMe SSD Drive in installation window and then onwards your installation goes smooth as butter. Once windows is finished installing it prompts to remove your bootable media and reboots.
And now your ordeal begins as your OS is unable to detect any bootable disk. So you remembered that you need to set your NVMe SSD as bootable. Phew that was so easy! . But to your horror you are unable to find any setting in your BIOS/ UEFI that enables you to boot your M.2 NVMe SSD.
What to do now as you have wasted your money and your time already. Could anything be done now to save us? Answer is YES.
You will just require a USB pendrive (an old 2GB USB pendrive or SD card is enough) which we will use to do initial boot and from there we will point it to boot our M.2 NVMe SSD drive. But please remember not to remove this pendrive my mistake or your OS will not boot. This method works equally good for Windows or Linux OSes.
All you need is to follow the steps correctly:-
Step 1:
Format a USB pendrive(2gb is enough) as FAT32 partition and make it a primary partition with the help of a partition tool such as Windows Disk management or other third party tools like Mini Partition Tool on Windows or Gparted on Linux. This step is to be done on some other PC / laptop.
Step 2:
Copy the following files and folders to the newly formatted pendrive from here:- .
Download the zip file named Clover-5147-X64.iso.7z.
You can learn more about this project here: Link: https://github.com/CloverHackyColor/CloverBootloader/releases
Step 3:
Unzip the downloaded file on another PC . You will get an bootable iso file you can write this bootable file to your pendrive or simply mount and copy its folders to pendrive. You will get 2 folders (‘EFI’ and ‘usr’). Now go to ‘EFI\CLOVER\drivers\off’ folder and copy ‘NvmExpressDxe.efi‘ driver file to ‘EFI\CLOVER\drivers\UEFI‘ incase of UEFI or ‘EFI\CLOVER\drivers\BIOS‘ in case of BIOS.
Step 3:
Insert this pendrive and set it as boot drive from Bios/ UEFI.
Step 4:
When you boot up a screen will be shown with the some choices to boot usually the first one will work. Upon selecting this option your freshly installed OS will boot. Once you reboot this option will be selected by default.

By default the boot menu wait time is 5sec. you can reduce it to 1sec by editing the following file in pendrive
go to ‘EFI\CLOVER‘ folder and edit ‘config.plist‘ file in notepad or other text editor. Search for ‘<integer>5‘ and replace ‘5’ by ‘1’. Save and reboot.
Now you can enjoy your new blazingly fast Computer!Clover-5147-X64.iso.7z